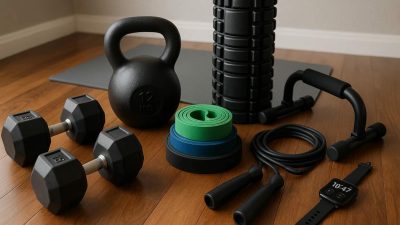
A jump rope might look simple, but the right one can torch calories, boost stamina, and push your cardio game sky-high. I’ve tested speed ropes, weighted options, and everything in between. This guide breaks down what really matters—so you can skip guesswork and jump straight into results.
Why Jump Rope Is a Top Cardio Tool

Don’t let its simplicity fool you—a jump rope is one of the most effective cardio tools I’ve ever used. It’s lightweight, low-cost, and absolutely brutal (in the best way) when it comes to burning calories and building endurance.
- Burns serious calories: At 10 to 15 calories per minute, jumping rope can rival running and HIIT for fat-burning power. Ten minutes of jumping feels like a full-body sprint.
- Total-body activation: It’s not just your legs doing the work. Your arms, shoulders, core, and coordination all get in on the action—building rhythm, balance, and stamina with every skip.
- Small but mighty: It fits in a backpack, costs less than dinner, and works anywhere—from your garage to a hotel room. No excuses, no barriers—just results.
Whether you’re after fat loss, agility, or stamina, the jump rope delivers. It’s efficient, effective, and always ready to raise your heart rate fast.
Types of Jump Ropes: What’s the Difference?
Not all jump ropes are created equal. I learned that after buying a basic rope and wondering why my arms were fried after five minutes. Whether you’re training for speed, strength, or just starting out, the right rope makes a massive difference.
Speed Ropes
- Fast and fierce: These are built for quick tempo workouts like HIIT or CrossFit. Their lightweight, wire-thin cables slice through the air and make double unders easier—if you’ve got the coordination.
- Minimal resistance: Because they’re so light, they don’t give you much feedback, which can be tricky for beginners but perfect for advanced athletes chasing speed.
Weighted Ropes
- Turn cardio into conditioning: Weighted ropes add extra resistance that challenges your arms, shoulders, and core while still delivering solid cardio.
- Best for endurance: I use these when I want slower, controlled jumps that torch calories and build stamina without relying on speed.
Beaded/Freestyle Ropes
- Tangle-free + visible: Beaded ropes make a gentle clack with every spin, which helps you time your jumps. That sound and visibility make learning rhythm way easier.
- Perfect for beginners: If you’re new to jumping or want to try freestyle or dance-based routines, this is the go-to style for control and consistency.
Each rope has its own rhythm. The key is finding one that matches your goal—whether that’s raw speed, strength, or just learning to stay in sync.
Material Matters: Cables, Coatings, and Durability

When I first picked up a jump rope, I didn’t think twice about the material. Big mistake. Turns out, the rope’s construction can totally change how it feels—and how long it lasts. Here’s what you need to know before you buy.
- PVC: Lightweight and flexible, PVC ropes are perfect for beginners. They’re easy to control, won’t sting your shins as much, and work great on indoor surfaces. Just don’t expect them to last forever if you’re jumping outside on rough pavement.
- Steel wire coated in nylon: This one’s for the advanced crowd. These cables are built for speed—super thin and responsive—but they’re unforgiving if you miss a jump. They’re ideal for double unders, fast footwork, and precision training.
- Beaded plastic: Durable, audible, and visible. Beaded ropes make it easy to feel and hear the rhythm, which is why I always recommend them to beginners or freestyle jumpers. Bonus: they’re tough enough to handle rough outdoor surfaces.
Choosing the right material isn’t just about comfort—it’s about control, feedback, and longevity. So pick the cable that fits your training surface, experience level, and workout intensity.
Handle Design: Comfort and Control
The rope matters—but don’t overlook the handles. I’ve dropped more reps than I care to admit because of slick, bulky grips that felt like holding onto soap. A well-designed handle can keep you jumping longer, smoother, and with better form.
- Ergonomics matter: Look for handles that fit naturally in your palm. Tapered or contoured grips offer better control, especially when your hands start to sweat. Foam padding or textured surfaces help prevent slippage during high-rep sets.
- Bearings vs friction: Handles with ball bearings rotate more smoothly and consistently, especially at high speeds. Cheaper ropes often rely on friction-based turning, which can feel jerky or slow—especially as the rope wears.
- Light vs heavy handles: Lighter handles are great for speed and rhythm, while heavier handles provide extra resistance and help build grip strength. It’s a personal choice—test both and feel what flows best with your style.
If the rope is the engine, the handle is the steering wheel. Get a pair that gives you confidence, not cramps. When it feels like an extension of your arm, you’ve found the right one.
Finding the Right Length for Your Height
A jump rope that’s too short trips you up. One that’s too long? Slows you down. I’ve fumbled with both and trust me—getting the right length is a total game-changer. Here’s how to size it like a pro.
- Quick measuring tip: Step one foot on the center of the rope and pull the handles straight up. They should reach your armpits—give or take an inch. That’s your sweet spot for general fitness and cardio.
- Adjustable vs fixed-length: Adjustable ropes are perfect for beginners or households with multiple users. But fixed-length ropes offer cleaner rotations and are often preferred by advanced jumpers or competitive athletes.
Jump Rope Length by Height
| Height | Rope Length |
|---|---|
| 4’9″–5’0″ | 8 feet |
| 5’1″–5’6″ | 8.5 feet |
| 5’7″–6’0″ | 9 feet |
| 6’1″–6’6″ | 9.5 feet |
| Over 6’6″ | 10 feet |
Still unsure? Go adjustable. Once you find your flow, you’ll know whether to cut it down or stick with what’s working. And when it’s dialed in just right, every jump feels lighter, faster, and more controlled.
Jump Rope Goals: Match the Rope to Your Training

Not every rope suits every goal. Once I matched the rope to my specific training style, my progress exploded. Whether you’re chasing fat loss, stamina, or razor-sharp footwork, there’s a rope that’ll get you there faster—and with fewer faceplants.
For Fat Loss
- Use a lightweight or speed rope: These let you move fast and keep your heart rate sky-high, which is exactly what you want when burning calories is the goal.
- Focus on tempo and volume: Go for short intervals, high reps, and minimal rest. Think 30 seconds on, 10 seconds off—repeat until drenched.
For Endurance
- Choose a weighted rope: The added resistance challenges your arms and shoulders, turning every session into a full-body grinder.
- Train longer, not faster: Pacing is key here. Set a timer and go for duration—5 to 10 minutes nonstop can feel like a marathon in a tight loop.
For Speed and Skill
- Ultra-light cables are your best friend: Perfect for advanced drills like double unders, triple unders, or fancy footwork routines.
- Great for boxers and CrossFitters: These ropes demand timing, rhythm, and lightning-quick wrists. Precision is the name of the game.
The right rope doesn’t just match your goals—it multiplies your results. Pick based on what you’re training for, and let the rope do half the work (well, almost).
Indoor vs Outdoor Use: Surface Considerations
Where you jump matters just as much as what you jump with. I’ve burned through more than one rope just from using it on the wrong surface. Whether you’re skipping in your living room or on the driveway, here’s how to protect your gear—and your gains.
- Indoor surfaces: Stick to smooth flooring like hardwood, rubber gym mats, or low-pile carpet. These minimize friction and reduce wear on your rope. Avoid concrete floors—even inside garages—as they eat through cables fast.
- Outdoor training: If you’re jumping outside, go with a rope designed for the pavement. Look for durable coatings like nylon or TPU, and consider cables with replaceable parts.
- Protect your investment: Rope protectors or mats can make a big difference in lifespan. A small portable mat on your patio or driveway can save your cable—and your wrists—from unnecessary wear and tear.
Bottom line: train wherever you want, but treat your rope like a tool—not a toy. Respect the surface, and your gear will last jump after jump.
Beginner Tips: Start Smart, Avoid Frustration

Jumping rope looks easy—until you smack yourself in the shin, trip every five seconds, and wonder if you’re just not cut out for it. I’ve been there. But the truth is, a few smart tweaks make all the difference when you’re just getting started.
- Start with a beaded or slightly weighted rope: These give better feedback, so you can hear and feel the rhythm. That makes timing your jumps way easier than using a thin speed rope right away.
- Slow down and stay consistent: Don’t chase speed. Focus on form, breathing, and steady cadence. Even 30 seconds of clean, controlled jumping beats 5 minutes of wild flailing.
- Record yourself: Watching your jumps helps spot bad habits—like knees too high, wrists doing too much, or arms flaring out. It’s the fastest way to improve your form.
- Wear the right shoes: Choose cross-trainers or running shoes with good shock absorption. Jumping barefoot or in flat shoes can lead to sore joints real quick.
Every skilled jumper started as a beginner. Give yourself room to mess up, but equip yourself to learn fast. A few solid tools and smart habits go a long way toward building confidence and rhythm.
Maintenance & Longevity: Keep It Jump-Ready
If you treat your jump rope like a throwaway toy, it’ll break like one. After snapping a few cables and cracking a handle mid-set, I learned that basic care keeps your rope performing and your workouts frustration-free.
- Store it right: Coil your rope loosely—don’t wrap it tightly around handles or shove it in a packed drawer. Sharp bends weaken the cable over time, especially with coated wires or beaded ropes.
- Wipe it down post-workout: Sweat corrodes materials, especially the grips and bearings. A quick wipe with a dry cloth keeps the handles clean and the cable from building up grime or moisture damage.
- Inspect it regularly: Every few weeks, check for frays in the cable, cracks in the handle, or loose bearings. A worn rope can whip you harder than you expect—or worse, snap mid-jump.
Jump ropes aren’t high maintenance, but they do deserve respect. A little care after each session goes a long way—keeping your rope in top shape and your rhythm uninterrupted.
Recommended Jump Ropes by Fitness Level
Not sure where to start? I’ve tested more ropes than I can count—some winners, some duds. These picks hit the sweet spot at every stage, whether you’re learning the basics or chasing triple unders. Here are my top jump rope recommendations based on experience level:
Beginner
- DEGOL Skipping Rope: Affordable, lightweight, and easy to control. Great for mastering rhythm without overcomplicating things.
- Decathlon Beaded Rope: Sturdy and tangle-free with great feedback. Perfect for building confidence and form from day one.
Intermediate
- RX Smart Gear Jump Ropes: Customizable cable weights and handle lengths. Ideal for skill building, double unders, and speed transitions.
- WOD Nation Speed Rope: Fast, durable, and fully adjustable. A favorite for CrossFit-style cardio workouts or quick interval sets.
Advanced
- Crossrope Weighted Jump Rope Set: Interchangeable weighted ropes with premium handles. Built for strength, endurance, and serious conditioning.
- Rogue PRO Jump Rope: Designed for speed, precision, and longevity. Trusted by athletes who demand top-tier performance and smooth rotations.
The best rope for you depends on your goals and how you like to train. Start simple, then upgrade as your skills sharpen—you’ll feel the difference with every jump.
Final Thoughts: Don’t Overthink It—Just Start
Let’s be honest—it’s easy to get caught up in all the options. But after years of jumping (and tripping), here’s my simple truth: the best rope is the one you’ll actually use. Consistency beats perfection every time.
- Stick with what you’ll use: Fancy features don’t matter if your rope stays in the drawer. Choose one that feels good in your hands and makes you want to jump—even if it’s basic.
- Start simple, level up later: Nail your rhythm, build the habit, and then upgrade as your skills demand it. Most of my progress came from mastering one rope, not collecting ten.
- It’s a formula: Rope + Rhythm + Routine = Results. No gimmicks. No shortcuts. Just you, your rope, and the will to keep going—one jump at a time.
So stop overthinking. Grab a rope, set a timer, and get after it. The cardio, coordination, and confidence will come faster than you think.